6. Nuxt
Last updated: October 24, 2020
Reviewed by: 
This project, which started as an experiment for an e-commerce site, has become a high-level framework for building productive Vue applications. This prototype was made publicly available a few weeks after the first official release of Next.js. Nuxt was created to solve many of the issues encountered when building applications for Vue, just as Next does for React. Today, it is pre-configured with the most important elements and intelligent default values based on well-researched best practices to provide the best experience for end users.
When it was first released, Nuxt was remarkably lightweight and could only be installed as a template on the command-line interface Vue CLI, which supports application development. Nevertheless, it was already capable of server-side rendering and could also generate static websites.
6-1 Nuxt 1.0
Released on January 8, 2018, with the cooperation of several additional contributors, and hosted on Now (Vercel). Their documentation is built with Nuxt.js itself and has already been translated into six languages at the time of this release. It includes various new features such as layout switching and improvements to middleware functionality.
In 2020, there will be further opportunities
In May, NuxtJS announced that it has decided to close a $2 million seed round. Additionally, the developers of the Nuxt.js framework have stated that Nuxt.js is always open source and a community-driven project. For the latest information, please check the blog.
6-3 File Structure
├── assets
│   └── README.md
├── components
│   ├── Logo.vue
│   └── README.md
├── content
│   └── hello.md
├── layouts
│   ├── README.md
│   └── default.vue
├── middleware
│   └── README.md
├── pages
│   ├── README.md
│   └── index.vue
├── plugins
│   └── README.md
├── static
│   ├── README.md
│   └── favicon.ico
├── store
│   └── README.md
├── README.md
├── jsconfig.json
├── nuxt.config.js
├── package-lock.json
└── package.json
This is the approximate default structure determined by how you answer the setup questions when using create-nuxt-app. Each directory contains a README.md file that explains what should be inside, along with links to the documentation.
There is a directory called content within the above structure, which may seem a bit ambiguous, but it was added because we chose to install the module Nuxt Content, a git-based headless CMS. We will introduce how to retrieve and use content from hello.md later.
6-4 Data Acquisition
Here, we will introduce a basic example of retrieving data from Contentful. First, you need to install the Nuxt module. Additionally, for security, you will need the dotenv module to manage local environment variables. Nuxt has added .env to .gitignore by default.
npm install contentful-module @nuxtjs/dotenv
Next, set the secret key in the .env file located at the root of the project.
CONTENTFUL_SPACE_ID=123
CONTENTFUL_ACCESS_TOKEN=abc
Then, inform Nuxt of this and add the Contentful configuration to nuxt.config.js.
require('dotenv').config()

export default {
 env: {
   CONTENTFUL_SPACE_ID: process.env.CONTENTFUL_SPACE_ID,
   CONTENTFUL_ACCESS_TOKEN: process.env.CONTENTFUL_ACCESS_TOKEN
 },
contentful: {
   default: 'master',
   activeEnvironments: ['master'],
   environments: {
     master: {
       space: process.env.CONTENTFUL_SPACE_ID,
       accessToken: process.env.CONTENTFUL_ACCESS_TOKEN,
       environment: 'master'
     }
   }
 },
 modules: [
   'contentful-module'
 ],
 build: {
   transpile: ['contentful-module']
 }
Finally, we will retrieve the data on the page.
export default {
 async asyncData ({ app }) {
   const data = {}
   await app.$contentful.client.getEntries({ content_type: 'homepage' })
     .then((res) => { data.intro = res.items[0].fields.intro })
   return { intro: data.intro }
 }
asyncData merges its return value into the component's local state, that is, as data. It can then be displayed by adding it to the <template>.</template> in the NET Framework as follows.
<p>{{ intro }}</p>
Here, we are retrieving a single field as an example, but you can understand the challenges of dealing with Contentful's data structure. It is strongly recommended to use GraphQL, and Nuxt provides a module that uses vue-apollo for this purpose.
6-5 Nuxt Content
Nuxt provides a unique headless CMS that can handle Markdown, CSV, YAML, JSON, and XML. As you can see, it is surprisingly easy to retrieve Markdown from the default hello.md.
async asyncData ({ $content }) {
   const page = await $content('hello').fetch()
   return { page }
 }
The display of content uses the included components.
<nuxt-content :document="page" />
6-6 Ecosystem
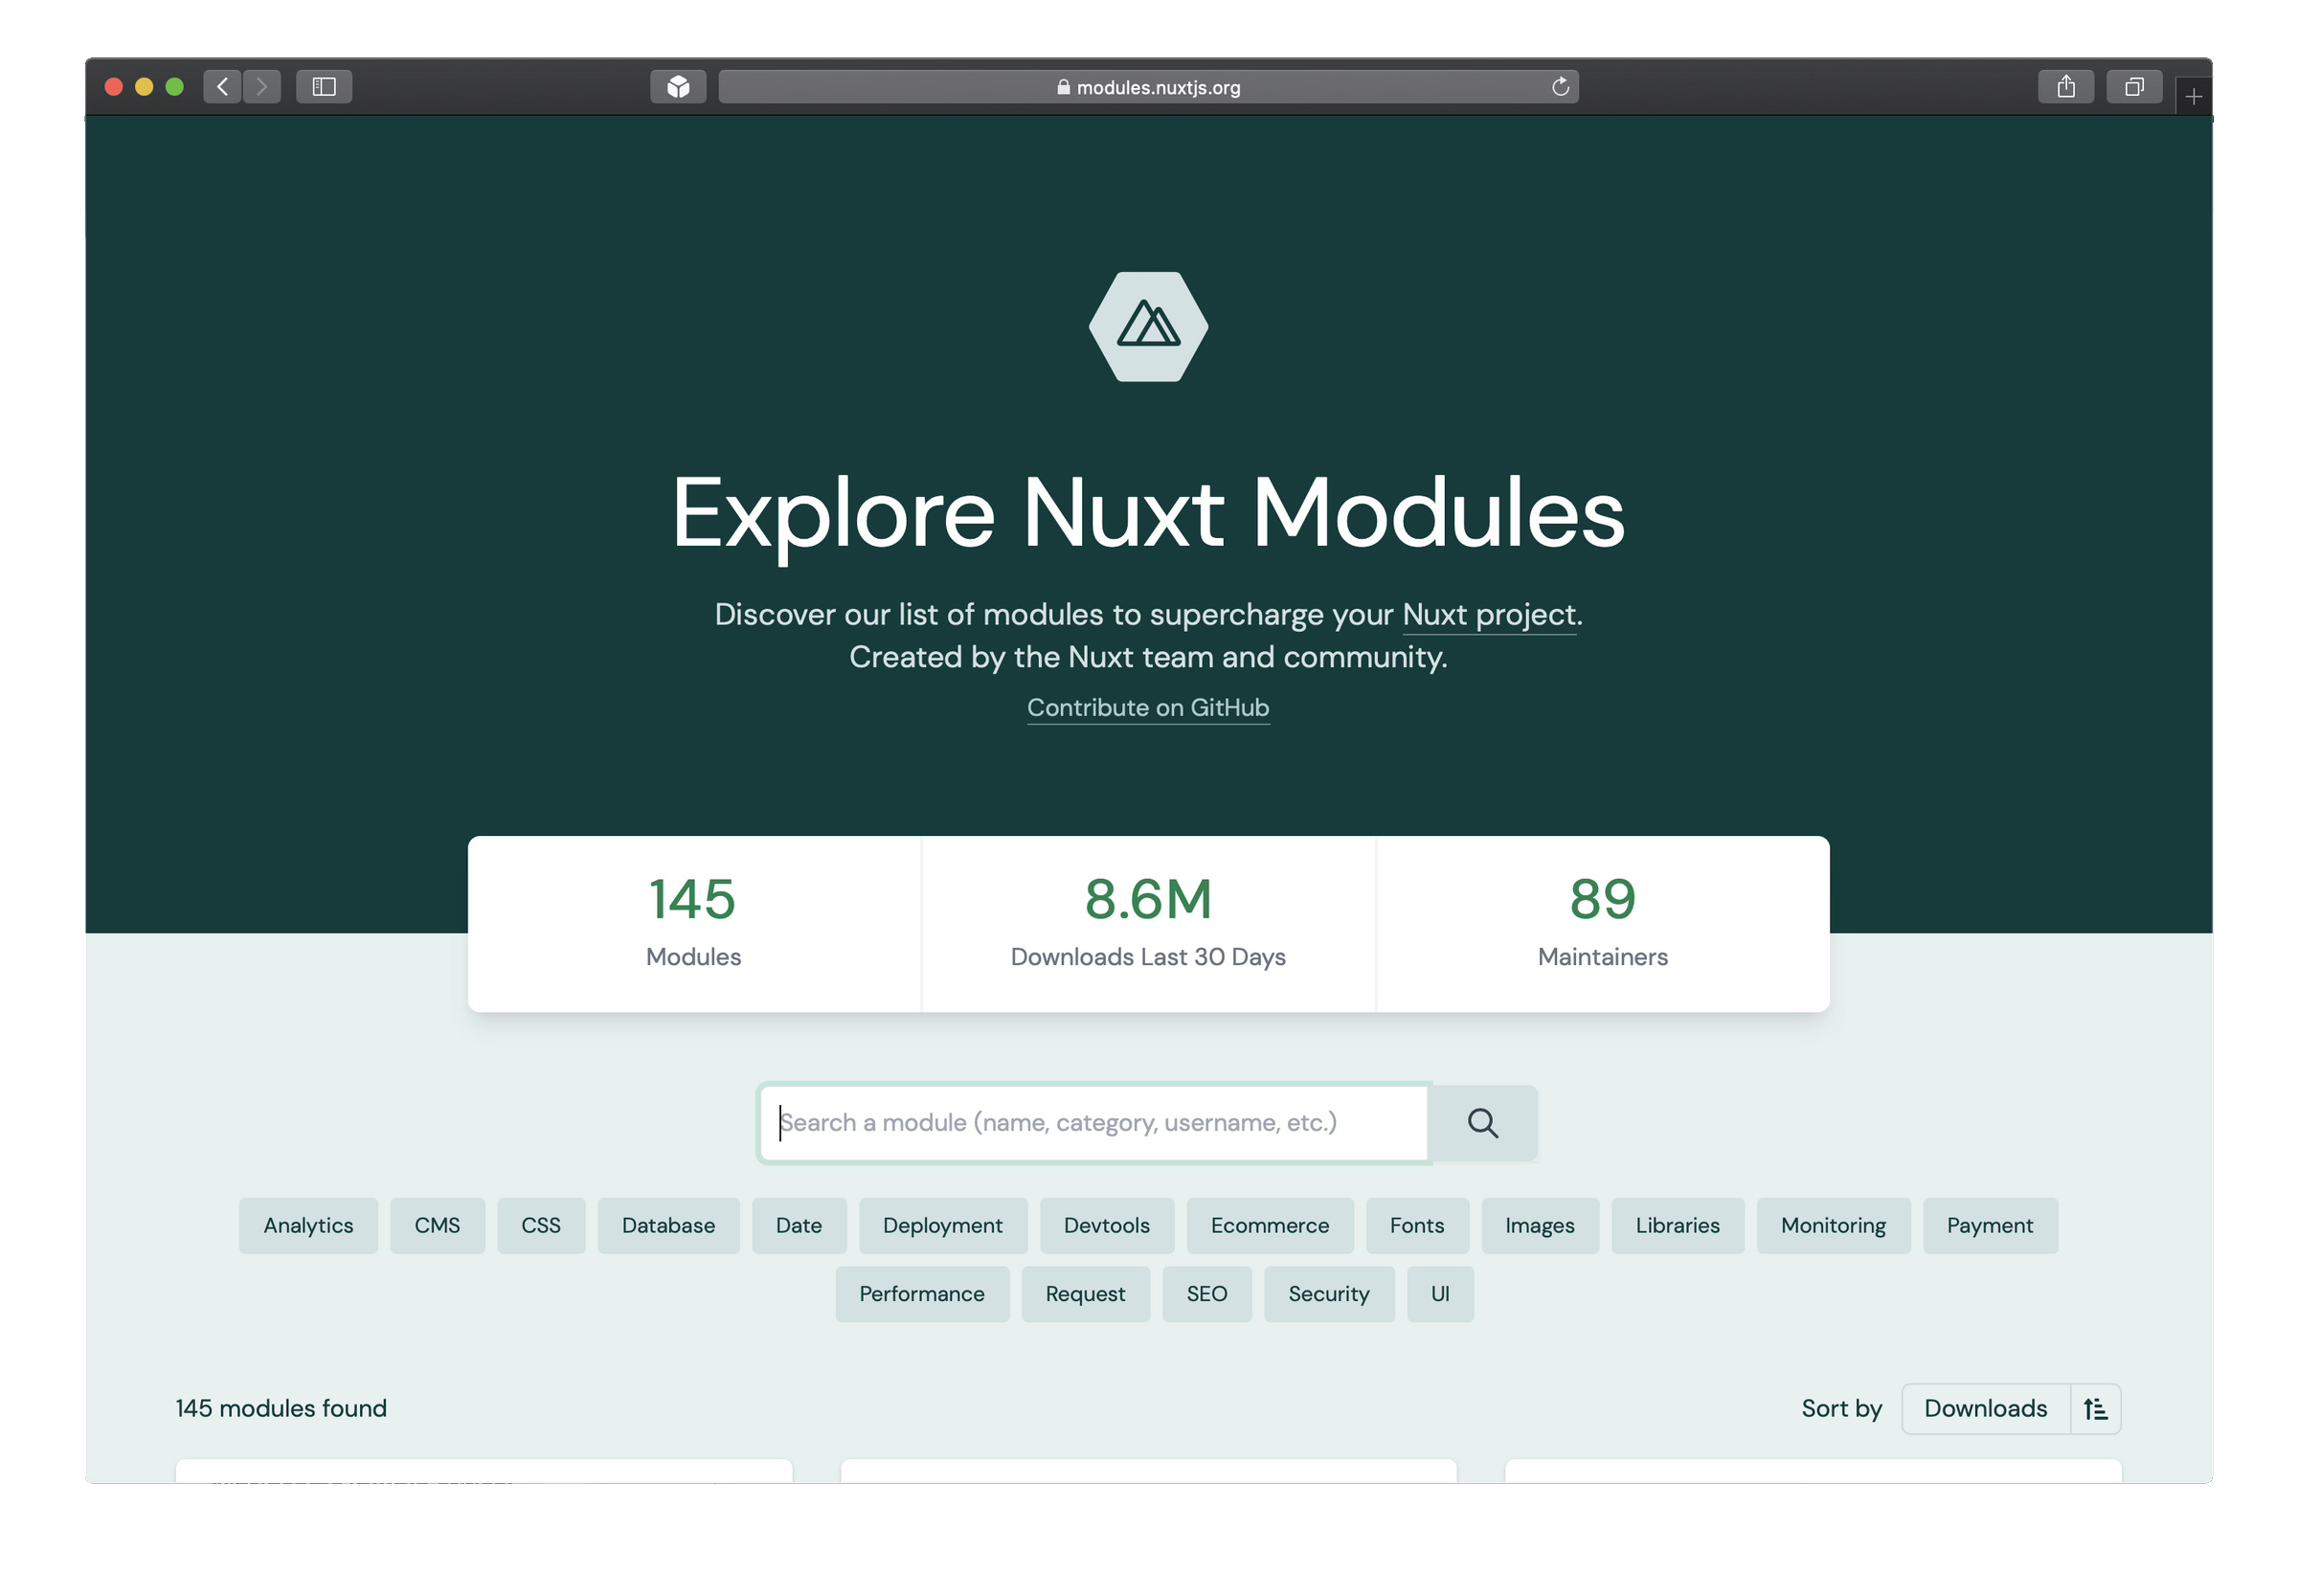
To extend functionality, you can use many Nuxt modules. The library includes over 140 modules, ranging from PWA integration to various headless CMS options such as Prismic, Storyblok, and Sanity.
6-7 How to get started?
The easiest way is to use create-nuxt-app.
yarn create nuxt-app <project-name>
# or
npx create-nuxt-app <project-name>
You will receive a series of questions about the various options and technologies you would like to use for this project. Once completed, all dependencies will be installed, and you will be able to navigate the project and get started immediately.
yarn dev
# or
npm run dev
6-8 Nuxt.js Deployment
Go to the FAQ page and scroll through the menu on the left to find items related to deployment. Deployment to popular platforms such as Vercel, Netlify, and AWS can be completed in just a few steps.
6-9 Conclusion
Nuxt.js is a full-service framework. It can be used as SSG, SPA, or server-side rendering applications. It packages some of the most advanced features among JavaScript-based frameworks. This includes the ability to run middleware before navigating to a new route and server-side middleware that allows you to register additional API routes without needing an external server. The options are endless, and its flexibility is truly remarkable.
- Automatically generate routes without settings
- Preview Mode for Use as SSG
- TypeScript Support
- A vibrant community that continuously improves the framework
- Automatically skip the Webpack build step if the code has not changed
- Capable of handling everything from simple static sites to large and complex server-side rendering applications
- It is possible to quickly and easily set up blogs and documentation sites
- e-commerce site
- Administrator Dashboard Application
7. Scully
Last updated: October 28, 2020
Reviewed by: 
Scully is the answer for Angular in the Jamstack. Created by experts at HeroDevs, this product is perhaps the only static site generator based on Google's JS framework, bringing Jamstack potential to all Angular projects.
Scully is quite a fresh solution, and the first commit created by Jorge Cano was on December 12, 2019. After several months of work, a stable 1.0.0 was released, making it ready for use in real projects.
7-1 Integration of Angular
Scully is integrated with existing Angular projects, allowing you to easily make your website static by running just one setup command.
An interesting feature of Scully is its implementation of machine learning. It uses Guess.js to search all routes of the site and pre-renders each page into plain HTML and CSS.
7-2 File Structure
├── ... Angular application files
├── dist
├── .scully
│   └── settings.yml
├── scully
│   ├── plugins
│   │   └── plugin.ts
│   └── ts.config.json
└── scully.[your-project-name].config.ts
When you run Scully in a project, several elements are created, all of which are simple configuration files for changing project settings, adding plugins, or customizing the behavior of tools.
7-3 Ecosystem
Despite being relatively new, Scully offers ways to create custom plugins, integrate with APIs, and provide third-party scripts. There is a small library of plugins, each with detailed instructions on installation and configuration.
7-4 How to Get Started?
If you already have an Angular application created, just run one command.
ng add @scullyio/init.
In workspaces other than Angular, you can install the Scully package as follows.
npm install @scullyio/init
Next, we will create a project.
nx g @scullyio/init:install -- --project=<projectName> command.
To build the project, execute as follows.
ng build --prod
Once the project is built, you can run Scully with npm run scully. That's all.
7-5 Conclusion
Currently, Scully is the only static site generator specifically designed for Angular. It is ideal for those who want to turn existing projects into static websites or try out the Jamstack approach in an Angular environment.
- A flexible and extensible plugin system that allows you to integrate your unique features into the Scully process.
- Using machine learning to find website routes and create plain HTML and CSS
- Easy to set up and can be integrated with existing Angular projects
- Existing Angular Project
8. Gridsome
Last updated: October 24, 2020
Reviewed by:
It is built to align with the Jamstack workflow and is heavily influenced by Gatsby (which has a similar architecture), but is created in the style of Vue.js. It is optimized for speed and ease of use. Gridsome is still a new product, but it is a solid product capable of integrating with any data source.
On October 10, 2018, the Gridsome team officially announced their first beta release. The goal was to create a Vue.js alternative to Gatsby. Gatsby had already gained a lot of popularity as it was able to build on the knowledge and advancements of the Gatsby team, which had been active for over three years.
8-1 File Structure
├── src
│   ├── components
│   │   └── README.md
│   ├── layouts
│   │   ├── Default.vue
│   │   └── README.md
│   ├── pages
│   │   ├── About.vue
│   │   ├── Index.vue
│   │   └── README.md
│   ├── templates
│   │   └── README.md
│   ├── favicon.png
│   └── main.js
├── static
│   └── README.md
├── README.md
├── gridsome.config.js
├── gridsome.server.js
├── package.json
└── yarn.lock
When you open the gridsome.config.js file, you will see some comments and only these settings.
module.exports = {
  siteName: 'Gridsome',
  plugins: []
}
Another important file is gridsome.server.js. This file connects to the Gridsome Server, allowing access to various APIs, reading data from local files and external APIs, and programmatically creating pages.
8-2 Data Acquisition
Let's take a look at how to retrieve data from Contentful for a single page. First, you need to install the Contentful plugin.
npm install @gridsome/source-contentful
Next, set the secret key in the .env file located at the root of the project.
CONTENTFUL_SPACE_ID=123
CONTENTFUL_ACCESS_TOKEN=abc
In other words, not only do you need to set up your own Git repository, but you must also add .env* to the .gitignore file. This is absolutely necessary to ensure that secret keys are not shared. The reason is that you can prepare different variables for each environment. The file names are determined as " .env.development" and ".env.production".
To use the Contentful plugin, please modify the settings in gridsome.config.js. It will be displayed like this.
module.exports = {
  siteName: 'Gridsome',
  plugins: [
    {
      use: '@gridsome/source-contentful',
      options: {
        space: process.env.CONTENTFUL_SPACE_ID,
        accessToken: process.env.CONTENTFUL_ACCESS_TOKEN,
        host: 'cdn.contentful.com',
        environment: 'master',
        typeName: 'Contentful'
      }
    }
  ]
}
Like Gatsby, Gridsome also provides a GraphQL data layer. For those who are not familiar with GraphQL, a convenient playground is available at http://localhost:8080/___explore. When you run gridsome development, a query to fetch data from Contentful is automatically created. Here, we will explain the configuration of the query in Index.vue.
<page-query>
query {
 products: allContentfulProducts {
   edges {
     node {
       id
       title
     }
   }
 }
}
</page-query>
To showcase our products, we simply use a looped edge.
<ul>
  <li v-for="edge in $page.products.edges" :key="edge.node.id">
    {{ edge.node.title }}
  </li>
</ul>
8-3 Ecosystem
The Gridsome plugin collection may not be as extensive as Gatsby's, but there are many useful plugins available for tasks such as connecting to your favorite popular CMS, setting up Google Analytics, and generating sitemaps.
8-4 How to get started?
Similar to Gatsby, the first step is to install the Gridsome CLI globally.
npm install --global @gridsome/cli
We have a collection of 3 official starters and 20 additional starters contributed by the community. We recommend using the default starter and replacing new-project with your preferred project name.
gridsome create new-project
Move to the project directory and execute.
gridsome develop
You should now be able to open the site at http://localhost:8080.
Introduction to Gridsome
The Gridsome team recommends connecting to deployment services that build sites from selected Git-based repositories. Top services include AWS Amplify, Vercel, and Github Pages. However, the leader among them is "Netlify," which is incredibly simple.
8-6 Conclusion
Gridsome is an excellent choice for quickly launching very lightweight and simple static sites. It can also handle complex reports to "generate thousands of pages in seconds." I believe Gridsome is worth considering even for large sites. However, we must not forget that this SSG is still in its early stages. Personally, I think Nuxt.js is safer for Vue-based sites. The Gridsome team will be working on developing new versions in the future, so stay tuned.
- Integration with all types of content sources
- Automatically split code
- Excellent experiential performance through instant route changes and prefetching
- Convenient Plugin Ecosystem
- Get optimized performance immediately, from small to large static sites
- A PWA front-end solution with a SPA feel, compatible with your preferred headless CMS